Skip to content

Posts from the ‘Web Services’ Category

OAuth2 and LabVIEW — Replacing the Web Server

Welcome to what will probably be the last update for this series of blog posts. In the very first article I wrote about this topic, I mentioned that I didn’t like using global variables to pass information from the web callback function to the main part of the application.

I’m finally going to address that design concern by completely changing how I handle the web callback. Credit for this approach goes to a couple of people: Jörg Hampel of Hampel Software Engineering (and the DSH Workshops) who first showed me this idea over Skype, and also Robert Smith, who wrote this excellent article about writing your own LabVIEW web server.

For this situation, I don’t need a full-blown web server–just something simple enough to receive the OAuth2 callback and parse the URI. So instead of depending on any of the three or four LabVIEW/NI web servers, I’m just going to use the TCP functions built into LabVIEW. I recommend you read the article linked above, but I’ll explain my approach here. I’ve updated the LabVIEW 2019 code in the Gitlab repo if you want to download it.

Read more

OAuth2 and LabVIEW — Revisited for 2020, Changes to the LabVIEW Web Servers

Enough about LabVIEW bugs (part 2, part 3)–let’s talk about LabVIEW 2020 features!

One of the significant (and essentially undocumented) new changes in LabVIEW 2020 was changing the default web server from the old LabVIEW Web Server to the new NI Web Server. Unlike the LabVIEW Web Server, which runs as part of a LabVIEW instance, the NI Web Server is a separate application dedicated to just being a web server.

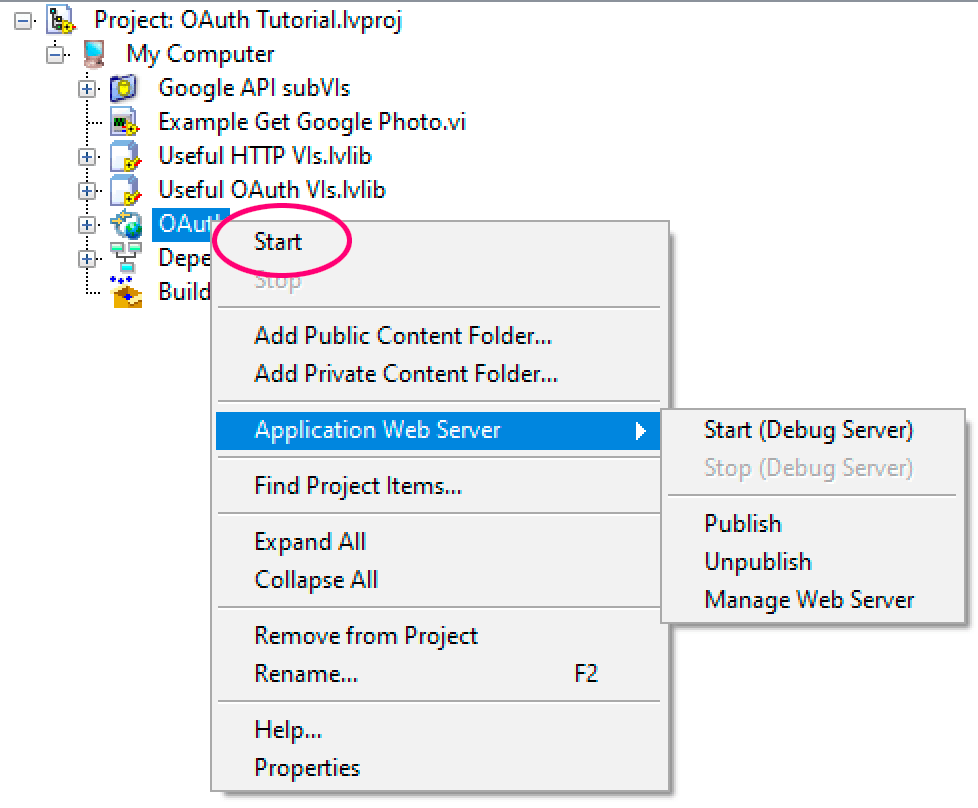
For the most part, you can use it just as before. There’s still a “Start” menu which you find by right clicking on the web service in the LabVIEW Project.

Start menu for starting the web service.

If you select this, the only change you’ll likely notice is that it’s running on a different port, shown below.

Read more

OAuth2 and LabVIEW — A Bug in LabVIEW’s SSL Certificate Handling

After discussing a LabVIEW 2020 bug in my last post in early June, I let the wind go out of my sails and set aside the new version for awhile. Around the same time, one of my other OAuth2 applications stopped working. It wasn’t urgent and I didn’t investigate right away, but it turns out that I found another LabVIEW bug lurking in the way SSL certificates are handled.

Now before anyone panics, almost no one will run into this bug. It does impact all recent versions of LabVIEW–2020 and 2019 for sure, but to be honest, I didn’t go back to earlier versions. I filed a bug report with NI, but it’s not clear if they’ll prioritize fixing it. Details follow…

Read more

OAuth2 and LabVIEW — Revisited for 2020, A Bug in the SHA256 VI

In part one of this 2020 update, I began a journey of updating my OAuth2 example to use a new feature in LabVIEW 2020–the new hash function that supports SHA-256, among other algorithms.

Where I left off, I needed to modify the output of the new VI to create a byte array instead of converting it to a lowercase hex string.

I proposed three choices:

  1. Ignore the 2020 VI and just use the .Net implementation I used in 2019.
  2. In my SHA256.vi, add code after Byte Array Checksum.vi to convert the hex string back into a binary array.
  3. Make my own copy of Byte Array Checksum.vi and remove the subVI which converts to a lowercase string.

Which one did you choose? I decided to try all three. I already had #1, since it was the 2019 version. Here’s a quick and dirty implementation of #2, where I convert the hex string back to a byte array.

After calling the 2020 VI, convert it back to a byte array

And here’s an implementation of #3, where I went and found the VI that called Bytes to Lowercase Hex String, made a copy of it, and removed the subVI call. I replaced it with a straight Byte Array to String.

Modify the vi.lib VI to replace the ASCII conversion with a Byte Array to String

What do you think so far? There are things I dislike about both #2 and #3.

  • In #2, it seems wasteful to convert it to ASCII, and then convert it back. These aren’t large strings, but it just seems like a hack.
  • In #3, I dislike the idea of modifying a vi.lib VI–especially one that’s not on the palettes.

I’m leaning towards #3, because it feels like the right implementation, even if it violates the “don’t mess with vi.lib VIs” principle.

Before I commit to a solution, let’s run the unit tests on each. The results for #1 pass with flying colors, of course. The results for both #2 and #3, though, fail. And I thought this was going to be easy. Keep reading below…

Read more

OAuth2 and LabVIEW — Revisited for 2020, Using the New SHA256 VI

After LabVIEW 2020 released, I thought I should revisit my OAuth2 example to see how I could apply new features to improve the code. I thought it would be simple and straightforward and magically better, and fit into a single blog post. But, I think it’s going to be more of a journey than that.

I decided to start with something simple: LabVIEW 2020’s implementation of the SHA-256 secure hash that’s needed for the code verifier. This ought to be able to replace the SHA256.vi in my 2019 example, which was based on a .Net call. This is one of the only things that was Windows-specific in my code.

My first step was to create a new repo for my 2020 code. I think I want to keep my 2019 version around, so I’m hesitant to create a branch to merge back into it. I may regret it, but it felt like a new repo was the way to go.

Next, after loading the project into LabVIEW 2020, I went to SHA256.vi and selected Find -> Callers. It’s only called from two places, one of which is a unit test helper VI. (Aside: The unit test was only listed because it used a helper VI. If you think that Find -> Callers should have also reported which .lvtest files call the VI, kudo this idea.)

Good, I thought–I have unit tests and can ensure that the new VI passes all my old tests. Spoiler alert: it wasn’t that easy. Keep reading below.

Read more

OAuth2 and LabVIEW — Part Four, Reusability

It’s only when you try to reuse your code that you really understand how reusable it is.

– Mr. Obvious

After finishing part three of this series of posts on OAuth2, I went back to my original goal of writing code to interact with my Wireless Sensor Tags for measuring temperature and humidity. The further I went down that path, the more I wanted to change the existing example code.

Since this is a blog post that is partly about how the example evolved, I wanted to write a part four to describe my thought process. The code has been updated in the repository: https://gitlab.com/bhpowell/oauth2-labview-tutorial


Overall file organization

My first step in adding support for the Wireless Tag web service was to duplicate Main.vi. I called the new copy “Wireless Tag.vi”, and began changing out the endpoints, IDs, secrets, and such. To reduce confusion about two top-level VIs, I renamed Main.vi to “Example Get Google Photo.vi”. Not necessarily a great name, but more descriptive than “Main”.

As I began changing out “google.com” and “googleapis.com” endpoints for “my.wirelesstag.net” endpoints, I realized I’d saved several of the subVIs with default values for those endpoints. So, even though I found all of the URLs on the top-level diagram that needed to be updated, when I ran the VI, it was still access Google APIs because of the default values.

Here’s an example for the VI that exchanges the code for the token. First, the original way I used the subVI:

Read more

OAuth2 and LabVIEW — Part Three, Improving the Example

This is part three of a three four nine part blog post where I describe how to use OAuth2 with LabVIEW. See also:

In part one, we created a web service that the authentication process is going to use to call us back with an authentication code. In part two, we wrote code to go through the authentication process and call an example Google web service. Here in part three, we’re going to start writing some tests, replace the JSON parser, and think about what we else we could do to improve the example.


Improvements for Testing

I’m usually not a Test-Driven Development (TDD) kind of guy.  That’s where you write unit tests first, show that they fail, and then write the code that passes the tests.  I’ll sometimes use TDD when I clearly know what the right answer for a function ought to be.  For example, I once used TDD for figuring out a SQL query to a database—I could look at the database and deduce what I wanted the query to return, so I wrote a test for that.  Then I iterated until I got a SQL query that returned the right answer, and then iterated until it was efficient.

In our OAuth2 case, I decided from the start not to use TDD.  I wasn’t as confident that I knew the “right answer” to each step.  But I still kept testability in mind as I went along, and I wasn’t afraid to go back and write tests (and refactor for testability) after the first pass of the app was “done”.

It’s worth talking about the structure of the C# example that I started from.  It was badly structured for testability.  Here’s a high-level pseudo-code overview of this structure:

Read more

OAuth2 and LabVIEW — Part Two, The Authentication Process

This is part two of a three four nine part blog post where I describe how to use OAuth2 with LabVIEW. See also:

In part one, we created a web service that the authentication process uses to call us back with an authentication code. Here in part two, we’ll write code to actually go through the authentication process and call an example Google web service.


Calling the Authentication Server

Okay, with the callback ready, we can now call the authentication server and request a code.  Fortunately, Google has conveniently set up example servers and client codes to make testing with their endpoints easy.  That’s what we’ll use for this example.

We will call https://accounts.google.com/o/OAuth2/v2/auth as our authorization endpoint.  It takes several parameters that are part of the OAuth2 standard which we’ll pass with the URL:

  • response_type=”code”
  • scope=”openid profile”
  • redirect_uri=<our redirect endpoint>
  • client_id=<client id registered in advance>
  • state=<state>
  • code_challenge=<code challenge that’s part of the PKCE extension hashed with SHA256>
  • code_challenge_method=”S256″

The “redirect_uri” is what we created in part one of this blog post. The “client_id” for our example belongs to an “AppAuth Example” which Google created for testing. The “state” is a random string used to discriminate between calls. “code_challenge” and “code_challenge_method” are part of the PKCE extension.

We’re also going to need some helper VIs…

Read more

OAuth2 and LabVIEW — The Evolution of an Example

This is part one of a three four nine part blog post where I describe how to use OAuth2 (and PKCE) with LabVIEW. OAuth2 is used to authenticate with web services such as Google, Twitter, Facebook, and almost every major cloud-based service today.

See also:

Introduction

I own a slightly faulty beverage refrigerator. What makes it slightly faulty is that it sometimes wants to be a beverage freezer—it starts cooling, and doesn’t stop. It only does this rarely, and is otherwise a nice enough refrigerator that fits conveniently in a spot in our laundry room, so I’m hesitant to replace it. Instead, being the engineer I am, I decided to address the issue with more technology!

I purchased a Wireless Sensor Tag and a Wemo Mini Smart Plug to solve the problem.  The Wemo Wifi plug controls power to the refrigerator.  The Wireless Tag monitors temperature and humidity in the fridge. I use an IFTTT recipe to turn on the power when the temperature is too high, and turn off the power when the temperature is too low.  I ask it to keep the temperature within a four Fahrenheit degree temperature range.  On average, it is on for one hour, off for four hours, and then repeats.

It works surprisingly well. I set the Wireless Tag to send its data to the cloud every five minutes. I can view temperature and humidity graphs over the last several months and know it’s working. IFTTT is imperfect as a control system, but has worked out more reliably than expected. It’s only missed the too-high/too-low alarm twice in the few months since I’ve had this setup, and I work around this by having the alarm continue to trigger every fifteen minutes until the temperature is back in range.

All in, I’ve spent about $90 to avoid buying a new, inexpensive refrigerator—but it was way more fun to do it this way!

I can’t help but wonder about using LabVIEW to replace IFTTT as the controller, or to use LabVIEW to analyze my months of temperature and humidity data—and that’s where this journey begins…

Read more